Windows 10 is one of the best-optimized desktop operating systems as it combines perfectly what’s best of Windows 8.1 and Windows 7. Microsoft has been improving Windows 10 since the launch day in an attempt to offer a better user experience. Windows 10 is getting better and smarter through major software updates.
Earlier this week, Microsoft announced the Windows 10 October 2018 update to compatible devices after months of beta testing. The October 2018 update won’t bring in a significant change to the operating system. However, there are a number of exciting features with it ranging from inking in office and Line Focus to the ability to work with smartphones.
The update has been available for a couple of days only, but we have started to hear some of the problems users are facing with the Windows 10 October 2018 update. Indeed, a lot of users are reporting that Windows update fails to work after updating to the latest version of Windows 10. If you are among those users who are affected by the issue, then we are here to help.
In the section below, we are going to show you how to fix Windows Update not working issue on Windows 10. For some background, the Windows 10 October 2018 update is rolling out to compatible machines. To check for update, open Settings on your device, then select Update & Security and install any update available. If you don’t see the update, check back later as the update is still rolling out to users worldwide.
-
Automatic updates
Automatic updates have been around since the day one of Windows 10. Once you have turned on Automatic Updates, your Windows 10 automatically downloads and installs software updates when they are ready without your permission. While it is a useful feature as it keeps your PC up-to-date, sometimes an update interrupts your work or make things worse.
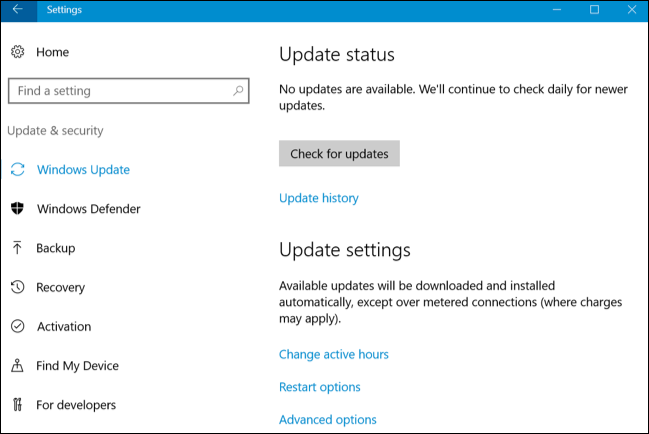
Specifically, when the download is complete, your computer automatically reboots to apply the changes. A lot of users find this annoying as there are times when Windows 10 restarts during their workday. In this case, Windows automatic updates may cause Windows update to malfunction. Fortunately, you can set up a scheduled reboot on Windows 10 so you can continue your work.
Step one: Open Settings on your device, then select Update & Security and select the Windows Update tab
Step two: Next up, click on Change active hours under the Check for Update button and you should see a pop-up window called Active hours
Step three: Now just select your start and end time and proceed with clicking on the Save button
Step four: Once you are done, Windows 10 will not automatically reboot during your preferred active hours.
Note that doing so only changes when your computer restarts. If you want to pause the update, select Advanced Options and turn on the switch for Pause Updates. Following this method, you can delay the update for up to 35 days. When the time comes, your device needs to get the latest software update before it can be deferred again.
-
Run the troubleshooter
Troubleshooter has been part of the Windows operating system for years. As the name suggests, the tool allows you to check for any issues scattering across your operating system. In this case, you can use the Troubleshooter tool to detect if there are any Windows Update issues.
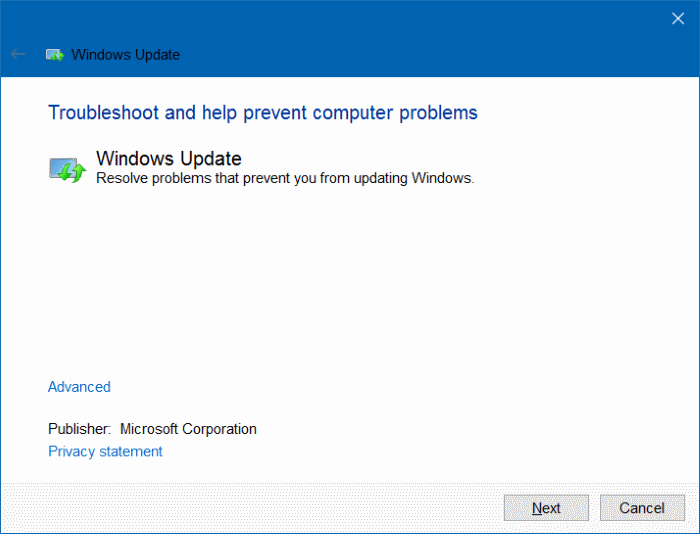
To access the Windows Update Troubleshooter, you first need to download it by heading over to this link and then click on Download troubleshooter for Windows 10. Once you are done, let the troubleshooter do the rest. You might be asked to enter your admin password during the process.
The process may take several minutes. Once done, the tool will offer a fix for your problem. If nothing works, then make sure you read on to find out more.
-
Reboot your computer
If the above solution fails to works for you, then the next solution is to perform a reboot. Keep in mind that rebooting may help fix major problems like app crashing, unresponsive screen, or internet dropping out. In this case, it may get Windows Update working again.
To do this, click on the Start Menu button, then click on the Power button and select Restart from the list of options. Once your computer finishes booting up, then open Settings, then select Update & Security and check for updates.

If the problem still persists, then check if you have enough storage space. In reality, Windows Update may not work properly if you are running low on storage. We recommend you have at least 20 GB of free storage for future software updates.
In reality, Windows 10 includes a built-in tool called Disk Cleanup which allows you to clean up the mess on your machine. To access Disk Cleanup, open This PC on your computer, then right-click on your system drive and select “Properties.” After that, click the “Disk Cleanup” button, then hit Clean up system files and select the files you wish to download.
If you stumble upon any issues during the process, let us know in the comments below.